
Last month I saw that Trish at Two Peas In A Pod Design was looking for bloggers to choose one of her patterns to review and I jumped at the chance.
I had a browse through Trish’s etsy shop and eventually decided on the Hazel Hipster.

Trish’s pattern are not pdf’s so I had to wait for it to arrive in the ‘old-fashioned’ way. I must say that while I love the convenience of a pdf it never quite compares with a professionally produced paper pattern with full size pattern pieces that you don’t have to tape together.
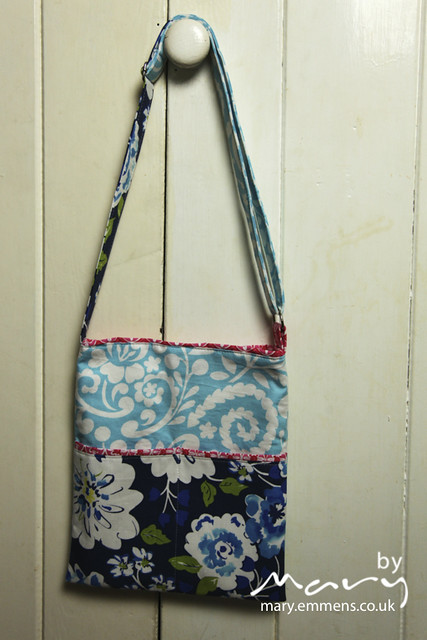
I had a read through of the pattern and a look at the style options and Bethan asked if I would make one for her. There are 2 style options, style A had exterior pockets which are straight and B has pockets at an angle (see pattern cover above). The pattern is also in 2 sizes, full size and mini.
Bethan opted for style A and had no choice over the size, I knew that mini would be most suitable for her at 7 yrs old.
The materials list doesn’t list the amount of fabric required for the mini bag but as I wasn’t buying fabric for this project and just using stash fabrics we looked at the pattern pieces and worked out what we needed from that. I traced the pattern pieces onto pattern paper and cut them out.
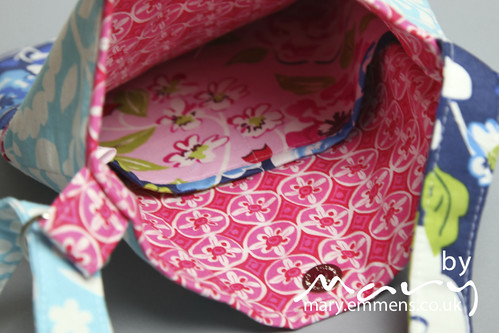
The bag has interior and exterior pockets and these are lined. When I was deciding which fabric to use for which part of the pocket I wrote a list so that I knew which piece was which as I was starting to get a little confused!
For interfacing the materials list states medium weight fusible fleece. Until recently I don’t think this has been easily available in the UK and I prefer to buy my interfacing in person rather than online so I can be sure of the weight that I am buying. Sometime last year in my local sewing machine shop I came across a bolt of what I would call fusible fleece, it had no label/branding on it and was £3.50 per metre (I’ve seen Vilene fusbile fleece on sale in the UK for £3.60 for half metre) so I thought I would give it a try. I’ve used it in frame purses and it works really nicely so time to give it a try in a bag.
The main panels of the bag (both interior and exterior) are all interfaced as is the outside of both pockets. The pattern piece for the pocket lining state Cut 1 for interfacing but I think this is incorrect as Step 2 of the instructions states ‘the pocket lining panels will not be interfaced’. Fortunately I had worked this out before cutting.
I have used magnetic snaps a number of times before so had no need to refer to the tutorial on Trish’s website. There was no suggestion in the instructions for where to place the snap, obviously (to me) it should be central and I estimated how far down from the top of the bag it should go (bearing in mind seam allowance). I discovered when I came to top stitching the bag that it could have done with being slightly lower as I struggled to sew in a straight line past the snap. I have just now looked at the tutorial and in the comments below someone else has asked the question how to measure for the snap and Trish suggests 1.5″. So I know for next time.
In step 5 of the instructions it’s time to construct the exterior and interior main pieces. The pattern instructs to leave a 6″ opening in the bottom of the bag for turning. I did not do this, I dislike stitching the opening closed on the right side and instead opted to leave a gap in step 7 when the interior and exterior are sewn together at the top of the bag. So rather than sewing all the way around the top of the bag I left a gap of 4″ to turn through. This worked absolutely fine and as I had done as I was told at the beginning of the pattern and read through it all before starting, I knew that I would be top stitching at the end so closing this opening tidily.
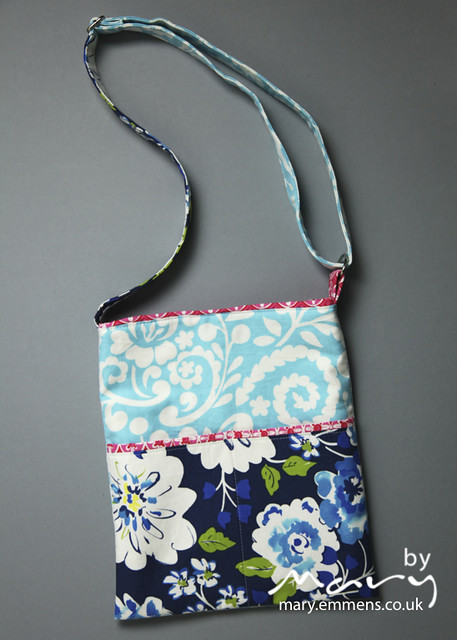
The strap for the bag is a simple fixed fabric strap. I was making this bag for Bethan and had in mind that I wanted it to last for a long time so a bag strap that is the right length now might be too short in the future (I am assuming that she still has a fair amount of growing to do!). I used a bag of mine that has an adjustable strap to work out how short it needed to be and how long I might want it to be in the future. I ordered a bag slider and ‘D’ ring set from Sew Who Are You?. The slider is 1″ wide so I cut the strap 4″ wide and 45″ long. I cut the interfacing 2″ wide and fused it down the middle of the strap. I then folded the strap long sides together and pressed and then opened it up and folded the edges into the middle and pressed again and top stitched down both sides of the strap.
I only used one of the ‘D’ rings and made an open ended strap for this 4″ wide by 3″ long and made it in the same way as the long strap.
Finished size of the mini bag is 9.5″ wide and 11″ tall.

Bethan is delighted with her bag, she took it to school for ‘show and tell’ this week and it was admired by a few of the mums as well as her class mates!
In conclusion: this is a well written pattern, there are photographs at every step, a space for notes at the end (which I’ve used for strap measurements ready for next time). Yes, I would use this pattern again, the mini size is a decent size, I’m not sure I would use the larger size. I’m actually thinking about scaling the mini one down and making a smaller one for using most days when all I need is somewhere for my keys and purse. I also think I would add an interior zip pocket and a key fob strap as I’ve done in previous bags.
Thanks to Trish for the opportunity to review this pattern, Trish has very kindly offered to giveaway a surprise pack of 2 patterns from her Etsy shop to one lucky reader. Open internationally.
To enter:
Leave a comment below telling me which of Trish’s patterns you would most like to try.
Extra entries:
‘Like’ Two Peas in a Pod on Facebook – come back and leave a comment telling me you me you’ve done so.
Share this giveaway on facebook, twitter or your blog and again leave a comment to let me know.
So that’s 3 possible entries. Giveaway will close on Wednesday 25 July at 9pm UK time. I will use random number generator to pick a winner. Please ensure that I have a way to contact you if you win.
Kim has also carried out a pattern review and is hosting a giveaway so why not pop over there for another chance to win.


I really love the madison bag. But its a hard choice with all those lovely patterns! Thanks so much. Love your version too!
I think that I would choose the Hazel Hipster Bag pattern! It is SO cute!! 🙂
I like Two Peas in a Pod on Facebook! 🙂
I shared your giveaway on Twitter here: https://twitter.com/GwenWindham/status/226006088951156737
I like the Hazel Hipster!
Thanks for an honest and thorough review Mary!
I would choose this same one! It’s the second time I’ve seen it on a blog and really love. Looks like you did a great job.
The Saint Mary Backpack looks cool as does the Hazel Hipster 🙂
Lovely bag – great review and helpful bits 🙂 I have tweeted this giveaway — @amycansew
I already like Two Peas in a Pod on Facebook – and made her a favourite sop in Etsy too 🙂 Great giveaway!!
I [heart] the Hazel Hipster bag pattern – it could be done in so many different fabric combinations and look good in tehm all 🙂 Fingers crossed for me!!!
Well I’m really liking the Hazel Hipster, esp now I’ve seen yours in real life – might give it a go!
I like Two Peas on facebook!
I’ve shared the giveaway – thanks Mary!
I really think this would be the bag for me! Although I could have my arm twisted for the apron!
Nice work there missus x
I am now a ‘liker’ x
Great review, thank you :o)
Want to try to sew Hazel Hipster bag – for me and my sister. And Madison bag also. They are so lovely
I love the Carol Jane dress pattern!
liked on FB! (mo.magoo)
and shared on FB. 🙂
I love the hazel hipster bag! sweet! thanks!
The Dorm Room Diva Pillows are perfect for my granddaughter and I love the Funk Farm pillows. thanks
I am a follower of Two Peas In A Pod and love it.
I tweeted the giveaway
http://twitter.com/JeanneGwin/status/226156345399853056
Oh, the Professor Peas Gadget Cases, for sure, with the Pocket Full of Posies banner a close second. Cute names to go with cute patterns.
Lovely version Mary! On the pocket…there is an exterior pocket piece and the lining of that pocket. The interfacing goes only on the exterior panel of the pocket ; ) your looks great! you have lots of helpful hints here and I sure do appreciate your review. Hugs from the US.
I really like this one, and also the Ava handbag 🙂
have also liked two peas in a pod on facebook (as Amy Fabric)
and have shared on facebook. Thanks!
I love the Fit to Be Tied bag, but the Madison bag is also a fave.
Tweeted the giveaway.
https://twitter.com/AlphaBecky/status/226320546709774336
I follow Two Peas on Facebook, too.
I love this bag & yours turned out fantastic!! I also love the St. Mary Backpack. Thanks for a chance to win! 🙂
I already like Two Peas in a Pod on fb! 🙂
I tweeted…
https://twitter.com/CGeates/status/226757004507611136
Pingback: : : by mary : : | Two Peas in a Pod
I love the look of the Mary Beth Messenger Bag and the Patsy Ann Apron Top. I also love the review you have written of pattern you tested. You have made a wonderful bag and it looks lovely. Thanks for sharing your thoughts about the pattern.
I love Ava bag:)
What a fun giveaway! I really like the Mary Beth messenger bag.
I think I’d love to try the Hazel Hipster, actually! It looks like a great bag.
I like the Madison bag best I think!
Pingback: It's summer | mary emmens
I would like to try her Madison Bag pattern. 🙂
I would like to try the Mary Beth messenger bag. It is really useful to read a pattern review. Thanks.
I’m loving trish’s hoot n nanny tote. I know for a fact my 3 year old daughter would love it.
Xxx
They are all so adorable. I like the “fit to be tied” and the “madison bag”. Have some great fabric for these!
Love the Madison bag.
Already a FB fan 🙂
Tweeted
https://twitter.com/hueisei/status/227685984752521216
I’d like to try the Ava Bag
I’ve ‘liked’ Two Peas in a Pod on Facebook
I’ve shared this giveaway on Facebook
Pingback: A bag fit for a crocodile | mary emmens